Liquid Fertiliser Benefits
In modern agriculture and home gardening, liquid fertilisers have become increasingly popular due to their fast action and ease of application. Unlike traditional solid or granular fertilisers, liquid fertilisers are dissolved in water and applied directly to soil or plant leaves.
This method ensures quicker nutrient availability, improved absorption, and healthier plant growth. Whether you are a farmer, gardener, or organic farming enthusiast, understanding the benefits of liquid fertilisers can help you achieve better yields in a sustainable way.
Table of Contents
What Is Liquid Fertiliser?
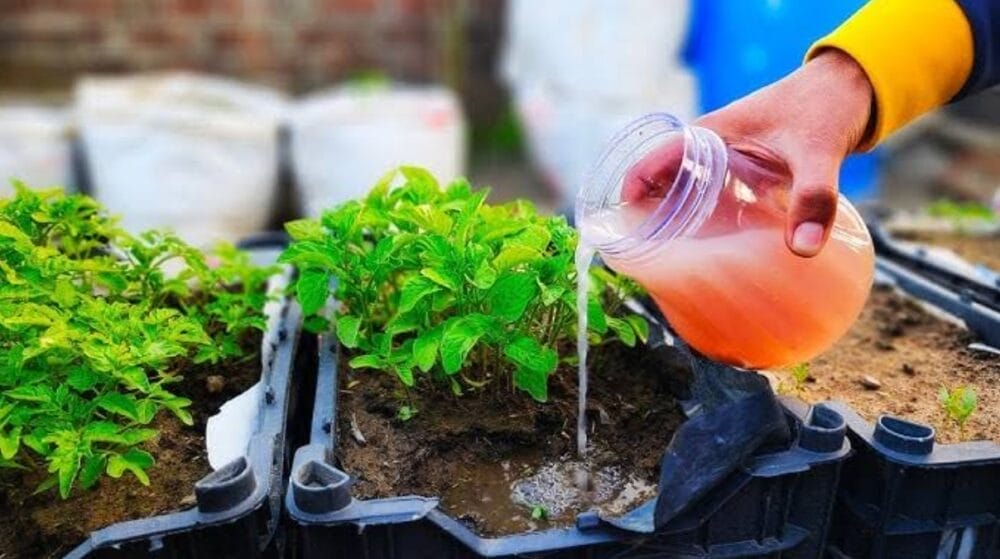
Liquid fertiliser is a nutrient-rich solution containing essential plant nutrients such as nitrogen (N), phosphorus (P), potassium (K), and micronutrients like iron, zinc, and magnesium. These fertilisers can be organic (made from compost tea, fish emulsion, seaweed extract, or vermiwash) or chemical-based. Liquid fertilisers are commonly used through foliar spraying, drip irrigation, or soil drenching.
Key Benefits of Liquid Fertiliser
1. Fast Nutrient Absorption
One of the biggest advantages of liquid fertilisers is their quick absorption by plants. Since nutrients are already dissolved in water, plants can absorb them immediately through roots or leaves. This is especially helpful during critical growth stages such as flowering, fruiting, or early seedling development.


2. Improved Nutrient Efficiency
Liquid fertilisers reduce nutrient loss caused by leaching, runoff, or evaporation. When applied correctly, nutrients reach the plant directly, minimizing wastage. This improved efficiency means plants receive the right amount of nutrients at the right time.
3. Even Distribution of Nutrients
Unlike granular fertilisers that may distribute unevenly in the soil, liquid fertilisers ensure uniform nutrient coverage. This helps in balanced plant growth and prevents nutrient deficiency in certain areas of the field or garden.
4. Ideal for Foliar Feeding
Liquid fertilisers are perfect for foliar application, where nutrients are sprayed directly on leaves. Leaves absorb nutrients faster than roots, making foliar feeding an excellent solution for correcting nutrient deficiencies quickly, such as nitrogen or iron deficiency.
Also Read: Aries HD NPK Fertilizer
5. Easy Application and Handling
Liquid fertilisers are easy to mix, measure, and apply using sprayers, drip systems, or watering cans. This reduces labor costs and saves time, making them suitable for both small home gardens and large-scale farming operations.
6. Enhances Soil Health (Organic Liquid Fertilisers)
Organic liquid fertilisers like compost tea, vermiwash, and bio-fermented solutions improve soil microbial activity. Beneficial microbes enhance nutrient availability, improve soil structure, and promote long-term soil fertility.
7. Suitable for All Types of Crops
Liquid fertilisers can be used for vegetables, fruits, flowers, cereals, pulses, and ornamental plants. They are also effective for potted plants, greenhouse crops, and hydroponic systems.
8. Better Control Over Nutrient Dosage
Liquid fertilisers allow precise nutrient management. Farmers and gardeners can easily adjust concentration based on crop requirements, growth stage, or soil condition, reducing the risk of over-fertilization.
9. Improves Crop Yield and Quality
Regular use of liquid fertilisers promotes healthy root development, lush foliage, better flowering, and improved fruit size and taste. Crops grown with balanced nutrition often show higher resistance to pests, diseases, and environmental stress.
10. Environment-Friendly Option
When used responsibly, liquid fertilisers—especially organic ones—are eco-friendly. They reduce soil pollution, protect groundwater from contamination, and support sustainable agriculture practices.
Common Types of Liquid Fertilisers
- Compost Tea – Made by soaking compost in water; rich in beneficial microbes
- Vermiwash – Liquid extract from vermicompost; boosts plant immunity
- Fish Emulsion – High in nitrogen; promotes leafy growth
- Seaweed Extract – Enhances root growth and stress tolerance
- Bio-Fermented Fertilisers – Made from plant waste, cow dung, or kitchen waste
Best Practices for Using Liquid Fertilisers
- Apply during early morning or evening to prevent evaporation
- Follow recommended dilution rates
- Avoid overuse to prevent nutrient burn
- Combine with organic farming practices for best results
Frequently Asked Questions (FAQ)
1. What is the main advantage of liquid fertiliser over solid fertiliser?
The main advantage is faster nutrient absorption and higher efficiency, as nutrients are readily available to plants.
2. Can liquid fertilisers be used for all plants?
Yes, liquid fertilisers are suitable for vegetables, fruits, flowers, indoor plants, and field crops when applied correctly.
3. How often should liquid fertiliser be applied?
Application frequency depends on the crop and fertiliser type, but generally once every 7–15 days is sufficient.
4. Are liquid fertilisers safe for organic farming?
Organic liquid fertilisers such as compost tea, vermiwash, and bio-fermented solutions are safe and widely used in organic farming.
5. Can liquid fertiliser damage plants?
Overuse or incorrect dilution may cause leaf burn or root damage. Always follow recommended guidelines.
6. Is liquid fertiliser cost-effective?
Yes, due to better nutrient efficiency and reduced wastage, liquid fertilisers are often cost-effective in the long run.
7. Can liquid fertiliser improve soil fertility?
Organic liquid fertilisers improve soil fertility by increasing beneficial microbial activity and organic matter content.
Conclusion
Liquid fertilisers are a powerful tool for modern agriculture and home gardening. Their fast action, easy application, and high nutrient efficiency make them an excellent choice for improving plant health, crop yield, and soil fertility. When used wisely, especially in organic forms, liquid fertilisers support sustainable and eco-friendly farming practices.
By incorporating liquid fertilisers into your crop management plan, you can achieve healthier plants and higher productivity naturally.
Also Read:Fertilizers are food for plants: they provide nutrients for plants to grow and thrive.